Showing posts with label burda #132 (08/2012). Show all posts

Sunday, 2 December 2012

The Long Sleeve Seamed Dress

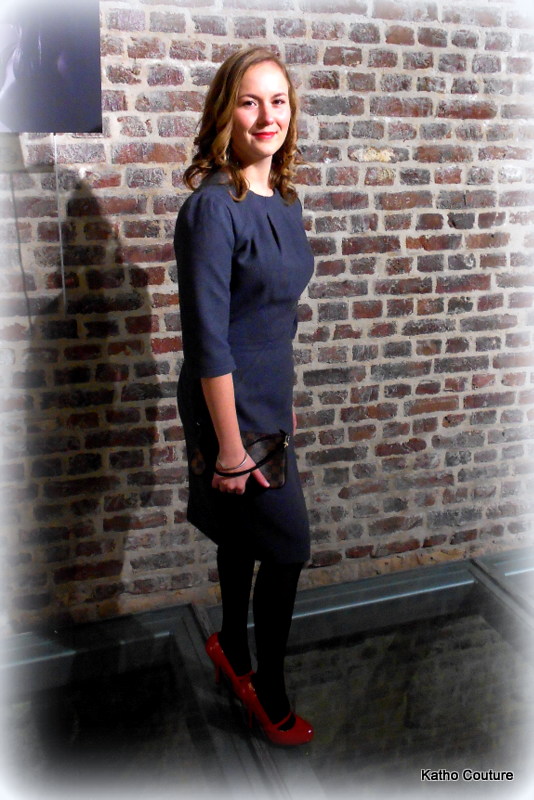
Finally some pictures of my finished dress (#131 Burda Style 08/2012). This dress took me a very long time to complete. I wanted the seams to align as perfect as I could. So I did a lot of adapting, basting and re-basting.
This dress patern is for a women of 1m70, I'm a petite so I needed to adjust the pattern to my length (1m60).

This is how I adjusted the pattern:
  • I took my measurements in the manner Burda instructs. 
  • Then I compared my measurements to these of Burda.
  • I adjusted my back length and my front waist length. I did this because these measurements didn't correspond with my measurements.
  • My front waist length is 45 cm. But I have a size 76 and in this size the front waist length is 47 cm. So I shortened the bodice with 2 cm. The same I did with the back length.

note for beginners (like me ;)): never shorten a bodice by cutting the underside of the pattern, you shorten a pattern by making a fold in the pattern and redrawing the lines (seams and pleads) so they'll match again. When you don't do it this way your seams wont align!

Because I adjusted a pattern for the first time I made a toile. I made my toile out of a very cheap polyester. This dress (showed below) ended up well and now I wear it to go to student parties.


While I was making this dress I met my knew best sewing companion.
It's so handy! I can't do without! This makes it so much easier to align those seams because your seam allowance is the same everywhere! Before I measured with my measuringtape but this is less accurate in my opinion.

Making the dress and how to align the seams and topstitching

For this dress I used a 100% wool. It was €35/meter, so I couldn't afford to mess it up!


Below you can see the beautiful aligned seams and top stitching.


This is how I did the top stitching:
  1. The top stitching in the bodice was already done, then I (machine)basted the two parts (bodice and skirt) together and aligned the seams. Then I pressed! Don't forget this, it's the most important part!
  2. While the two parts where basted I marked the point where the top stitching had to begin with a white basting thread (see below)
  3. Then I undid my basting, topstiched the seam and stitched it all together again, while paying attention to the seam and top stitching! I do this by pinning the top stitching and seam together before pinning the rest of the bodice and skirt together. Then I stitch.
  4. Et voila! perfect aligned seams and top stitching!


 And here is my dress! The pictures are taken at the première of a local theatre piece: Popcorn. I loved it! It was a theatre piece like I've never seen before with lots of action.


(btw: I adjusted the sleeves of the dress, I think the original sleeves made me look smaller and made the dress way to conservative.)

Wednesday, 28 November 2012

Sneak Peak

I'm waiting for a picture moment/photographer to make pictures of my finished long sleeve seamed dress (burda edition 08/2012) But in the meantime I can give a sneak peak of my new project. A Dior inspired suit in a plaid fabric. I'm taking a huge jump in the dark with this project. I've never made a jacket and I've never worked with plaid! I hope it ends well ;)


The jacket I didn't make myself, but it is one of my favourites.

Friday, 2 November 2012

Finally The Cape

The inspiration for this cape was the cape of Red Riding Hood. I wanted one for a very long time! I've finished this project a while ago but didn't find the time to make a picture of it. I'm not a person who likes to be in pictures so I kept delaying the picture moment of this Cape.But a few days ago I got my knew best sewing-buddy 'Claudette.

This cape is one of my most frequent worn self-made garments! I'm totally in love with it. But have no illusions! It's also the most unpractical garment, try carrying a shoulderbag!

This cape is based on the burda pattern # 132 (08/2012) For this cape I used a cheap wool velvet (80% wool, 20% polyester) I've found on www.stoffen.net


 The buttons I bought at Veritas. They where very expensive! 3,25 euro à piece!


My machine embroidery stitching went very well (to bad I couldn't take a clear picture of it) I'm quite proud of it!
Above you can see the detail of the armholes. I didn't make the paspel armholes as in the orignal design, but instead I opted for armholes in the side seams. I did this because of practical considerations. Armholes in front of the cape would make it even worse to carry a purse!
I can proudly say that the inside of my cape is as beautiful as the outside! I love this lining fabric! You can buy it in different colours (again on stoffen.net, search for Futter Jacquard Paisley)

This cape wasn't difficult to make and lots of fun! I recommend this pattern!

Ps: beneath the cape Claudette is wearing my self-made skirt based on the burda pattern #111a (08/2012)