Sunday, 16 December 2012

BabyShower Gift

In november my boyfriends niece was born. I love cute (vintage) baby clothes so I decided to make a cute dress as a gift.
My mom made me adorable dresses when I was a child (I'll post a picture of such a dress very soon ;)) I think that's where I got my love for petticoats and big dresses.

The dress I finished a couple of months ago but couldn't blog about it because I wanted the dress to be a surprise.

The pattern I used was Burda 9802
 

Just now, while writing this and  looking for a picture of the pattern, I realise I made a mistake. I thought the pattern didn't include seam allowances so I added the seam allowances. That explains why the dress looked so big. But children grow so that won't be such a big problem ;).

I have to keep this in mind when I use an other pattern of Burda. I'm used to using patterns of Burda Style, and these patterns doesn't include seam allowances.
Below you can see my result. I love it! It's such a cute dress and bloomers!

Front of the dress

 Back of the dress


 Back of bloomers


Front of bloomers
(In the background you can see my granny square blanket that is not yet finished. When i'ts finished I'll post a tutorial about this ;)

You may recognise the fabric. I made my cherry shirt out of the remnants of this baby dress.

Have a great Sunday evening!

Wednesday, 12 December 2012

Paris here we come!


In February me and one of my dearest friends will go to Paris for a weekend! We are both fashion addicts so Paris is our Mecca! We planned a trip to the Moulin Rouge! Yeah! You can't visit Paris without a trip to the Moulin rouge, the Eiffel tower, the Louvre museum and last but not least the galleries Lafayette. So we are going to visit them all! Our trip to Laduréé, Longchamps and Chanel are also already planned ;) (If you don't know Laduréé you HAVE to visit the website!)

To visit the Moulin Rouge I'll need an appropriate dress. So I'm making one! Yesterday I bought the fabric! Black cotton sateen and cream sateen. I'm making the Butterick 5605 again but this time I'll make view A. View C I've made already (see post).

B5605
Line Art


To go with this dress I'll buy an ivory petticoat (www.topvintage.nl)
 
This dress is inspired by Coco Chanel my (and many others) ultimate fashion icon!


Sunday, 2 December 2012

The Long Sleeve Seamed Dress

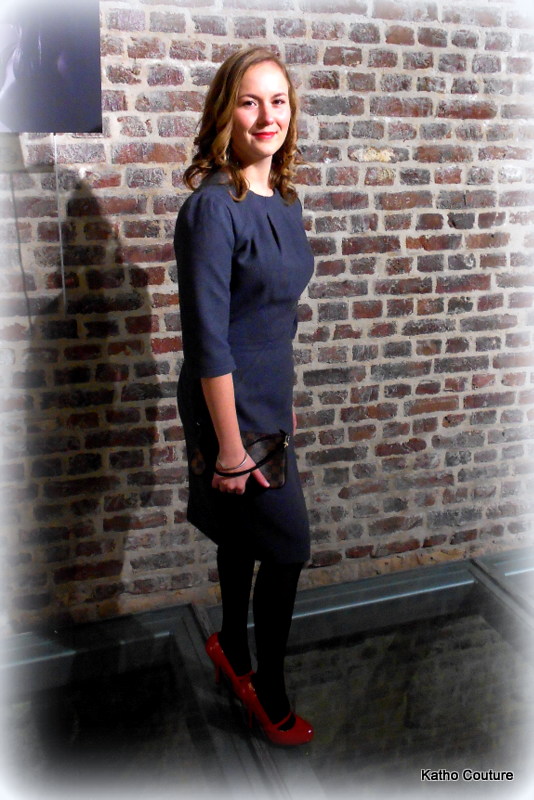
Finally some pictures of my finished dress (#131 Burda Style 08/2012). This dress took me a very long time to complete. I wanted the seams to align as perfect as I could. So I did a lot of adapting, basting and re-basting.
This dress patern is for a women of 1m70, I'm a petite so I needed to adjust the pattern to my length (1m60).

This is how I adjusted the pattern:
  • I took my measurements in the manner Burda instructs. 
  • Then I compared my measurements to these of Burda.
  • I adjusted my back length and my front waist length. I did this because these measurements didn't correspond with my measurements.
  • My front waist length is 45 cm. But I have a size 76 and in this size the front waist length is 47 cm. So I shortened the bodice with 2 cm. The same I did with the back length.

note for beginners (like me ;)): never shorten a bodice by cutting the underside of the pattern, you shorten a pattern by making a fold in the pattern and redrawing the lines (seams and pleads) so they'll match again. When you don't do it this way your seams wont align!

Because I adjusted a pattern for the first time I made a toile. I made my toile out of a very cheap polyester. This dress (showed below) ended up well and now I wear it to go to student parties.


While I was making this dress I met my knew best sewing companion.
It's so handy! I can't do without! This makes it so much easier to align those seams because your seam allowance is the same everywhere! Before I measured with my measuringtape but this is less accurate in my opinion.

Making the dress and how to align the seams and topstitching

For this dress I used a 100% wool. It was €35/meter, so I couldn't afford to mess it up!


Below you can see the beautiful aligned seams and top stitching.


This is how I did the top stitching:
  1. The top stitching in the bodice was already done, then I (machine)basted the two parts (bodice and skirt) together and aligned the seams. Then I pressed! Don't forget this, it's the most important part!
  2. While the two parts where basted I marked the point where the top stitching had to begin with a white basting thread (see below)
  3. Then I undid my basting, topstiched the seam and stitched it all together again, while paying attention to the seam and top stitching! I do this by pinning the top stitching and seam together before pinning the rest of the bodice and skirt together. Then I stitch.
  4. Et voila! perfect aligned seams and top stitching!


 And here is my dress! The pictures are taken at the première of a local theatre piece: Popcorn. I loved it! It was a theatre piece like I've never seen before with lots of action.


(btw: I adjusted the sleeves of the dress, I think the original sleeves made me look smaller and made the dress way to conservative.)

Wednesday, 28 November 2012

Sneak Peak

I'm waiting for a picture moment/photographer to make pictures of my finished long sleeve seamed dress (burda edition 08/2012) But in the meantime I can give a sneak peak of my new project. A Dior inspired suit in a plaid fabric. I'm taking a huge jump in the dark with this project. I've never made a jacket and I've never worked with plaid! I hope it ends well ;)


The jacket I didn't make myself, but it is one of my favourites.

Thursday, 22 November 2012

Serious fabric shopping

Beneath you can find an update of my stash. I thought that my stash was very small. Especially comparing with some other bloggers ;). So yesterday I made a shopping trip to my favourite fabric store 'Maison Dorée'. I knew what I wanted, thank god, or I would have spent hundreds of Euros. I did some damage control and managed to leave the shop with 100 Euro less in my pockets.
I bought two fabrics, one red cotton sateen and one sapphire blue jersey to make myself some blouses. It will be the first time that I will work with jersey. I also bought lining to make a dress out of my beautiful birdy silk chiffon. I bought hair canvas (much more expensive then I thought) and some interfacing to reinforce the plaid jacket I'll be making very soon. Finally I bought a burda pattern, some hand-sewing needles, a twin needle, two shades of yarn, buttons and an invisible zipper.


The other fabrics in the picture are part of my stash. some I bought earlier, the lovely striped fabric in the middle my grandmother gave to me.
The plaid fabric and red lining I also bought at Maison Dorée.

I realise just now that my stash is very colourful :D

Saturday, 17 November 2012

Anna Karenina

 
Kiera Knightly at the premiere of 'Anna Karenina'

You got to love this gown! I'm totally in love with it. I'm going to do some pattern spotting to create my own (one day ;)).
I also love her make-up and hairdo! Such a beautiful women!

Friday, 16 November 2012

I love Fabric!

You probably know I bought Claudette on Ebay. This was my first Ebay purchase ever. But you know how it goes. I think I have to admit I'm becoming a fabricoholic. After my first purchase on Ebay I started checking sellers of fabric. Someone recommended a seller on her blog (sorry but can't remember who). When I visited the Ebay store May's Silk store I fell in love with a fabric. I just got to have it! At first I was a bit doubtful, but then my love for the fabric won! I bought it, and today (10 days) later the mailman rang my doorbell :D

It is even more gorgous then in the picture and I'm so happy with it. Here you can find the link of the fabric I bought.


The seller claimed it was 100% silk. I had to test this!

Test one: 

When you rub the silk together it has to sound like walking in fresh snow.
The fabric DID sound like walking in fresh snow! What a delicious sound. Reminds me of my holidays in the mountains and snowboarding!

Test Two:

The legendary burn test. When you burn a little piece of fabric or a thread it should smell and behave like you're burning hair. When I burned it it definetly smelled like burned hair. This website says the fabric should stop burning when the flame isn't near it. Mine kept burning, maybe it would stop eventually but I panicked and blew it out immediately :D So I'm not sure about this one. The ash was the same like described in the above website (see picture below). I think it is a 100% silk or at least it contains a lot of silk.


What matters to me is that I'm totally in love with the fabric.

The big Question!

I've never worked with silk so this will be my first! But how will I manage to do this? I don't even know what to make out of it!

I have several questions.
  1. Can you pin silk or will it be ruined when you do?
  2. How do you sew silk??? I have a hunch that this won't be easy because the silk I bought is very very very thin!
  3. How do you finish the edges?Zig-zag won't do I assume? I think I will use the French seam technique, but what do you advice?

    French seam.
    The French seam is a couture seam finish used in high-end clothing and is one of the most beautiful seams for any type of fabric—not just silks. It completely conceals raw edges and is sometimes used on the outside of garments. Since it ultimately has many layers, it is best used with lightweight and sheer silks such as three-ply or four-ply silk or silk crepe, crepe de Chine, charmeuse, chiffon, and georgette.
    Wrong sides together
    With wrong sides together, sew a 3/8-inch seam.

    To make a French seam, start by pinning the fabric with the wrong sides together. Sew a seam 3/8 inch from the raw edge. Use your bird and clamp tool to hold one end of the fabric, and carefully trim the seam allowance to about 1/8 inch.
    Bird and clamp tool
    Use a bird and clamp tool to help you hold the fabric steady as you trim.

    Position the seamed fabric on an ironing surface with the seam allowances showing. Press the seam allowance to one side. This step helps you get a good, crisp edge in the next step.

    Now, with right sides together, fold the fabric along the seamline over the raw edges and manipulate the fabric between your fingers to bring the well of the seam to the very edge.
    Fold
    Fold the fabric with right sides together over the previous seam (above). To finish, sew a 1/4-inch seam, and press to one side (right). The seam allowances are completely hidden.
    Finish

    Pin and sew a 1/4-inch seam allowance. Press the seam to one side; then press again from the right side of the garment. (http://www.threadsmagazine.com/item/3702/seam-finishes-for-silks
     
I hope someone can give me some advise.


Monday, 5 November 2012

To look for a needle in a haystack


Today I lost my favourite embroidery needle :( Can't find it in all my rubbish!

And I finally made the decision which books (about sewing) I will buy. Looking for the right book is like looking for a needle in a haystack! I've been looking and looking and comparing and doubting, but never quite found what I was looking for. Then I found a book but there was a negative comment about it. Today I didn't care about negative comments and ordered anyway!

The first one I ordered is "Tailoring: The classic guide to sewing the perfect jacket".
Tailoring 
Al my up comming projects will be jackets or coats so this will come in handy! Gertie (Gertie's new blog for better sewing) recommended this book in one of her tutorials about 'how to make a coat'. 

The second book I bought is Couture Sewing Techniques by Claire Shaeffer. 
Couture Sewing Techniques 
This one was recommended by Frabjous Couture. I hope I'll be learning a lot new techniques! 
The books will arrive within 7 days (how is it possible to wait that long??). I almost burst with excitement!

Sunday, 4 November 2012

My thoughts are with Colette

I just got very sad news. One of my colleagues is in the hospital because of a brain haemorrhage. At the moment she is kept in a artificial coma. I hope with all my heart that she will recover. I'm really devastated. Before the autumn holidays she came to me to ask me some sewing advice. She was very enthusiastic and wanted to take up sewing again. She just bought a new sewing machine and was looking forward to start a new project. I can't believe she is in the hospital right now.
All my hopes and thoughts go to Colette.

Friday, 2 November 2012

Finally The Cape

The inspiration for this cape was the cape of Red Riding Hood. I wanted one for a very long time! I've finished this project a while ago but didn't find the time to make a picture of it. I'm not a person who likes to be in pictures so I kept delaying the picture moment of this Cape.But a few days ago I got my knew best sewing-buddy 'Claudette.

This cape is one of my most frequent worn self-made garments! I'm totally in love with it. But have no illusions! It's also the most unpractical garment, try carrying a shoulderbag!

This cape is based on the burda pattern # 132 (08/2012) For this cape I used a cheap wool velvet (80% wool, 20% polyester) I've found on www.stoffen.net


 The buttons I bought at Veritas. They where very expensive! 3,25 euro à piece!


My machine embroidery stitching went very well (to bad I couldn't take a clear picture of it) I'm quite proud of it!
Above you can see the detail of the armholes. I didn't make the paspel armholes as in the orignal design, but instead I opted for armholes in the side seams. I did this because of practical considerations. Armholes in front of the cape would make it even worse to carry a purse!
I can proudly say that the inside of my cape is as beautiful as the outside! I love this lining fabric! You can buy it in different colours (again on stoffen.net, search for Futter Jacquard Paisley)

This cape wasn't difficult to make and lots of fun! I recommend this pattern!

Ps: beneath the cape Claudette is wearing my self-made skirt based on the burda pattern #111a (08/2012)

Presenting Claudette

Last sunday 'Claudette' became my new best sewing-buddy. I found her on Ebay.  Although she hasn't the exact same measurements as I do, I bought her because she was a bargain.

She'll have to do until I've saved enough money to buy me a tailor's dummy that is adaptable.

Thanks to Claudette my pictures of projects will be posted a lot faster, because I don't have to wait until I have a picture moment :D I hate being in one!

I'll also start designing my own patterns soon (thanks to her).